Matt Archer's Blog

  • LinkedIn

  • Twitter

  • Twitter Updates

  • New Book

    I'm working on a new book. View the home page for the 'Tips for manual testers working in an agile environment' book
  • Enter your email address to receive notifications of new posts by email.

  • Subscribe

Archive for the ‘Testing’ Category

15 controversial testing tweets from #CAST2012

Posted by Matt Archer on July 24, 2012

I wasn’t able to attend the Conference of the Association for Software Testing (CAST), but I did follow the event closely on Twitter (#CAST2012). During the event, a few times each day, I browsed the #CAST2012 Twitter stream and added any tweets that caught my eye to my list of favourites. When the conference ended, I looked at the tweets I had within my list of favourites and something stood out. To many of the Testers, Test Managers and even Heads of Testing that I meet, a large majority of the tweets would be seen as controversial. Not because they are crazy ideas (far from it, at least from my perspective), but because they go against what many people within testing still believe are our “best practices”.

I happen to agree with all of the tweets that I have listed at the bottom of this post. What do you think? Do the tweets sit well with your testing beliefs or do they leave you feeling uneasy? To put it another way, how many of the statements that I have written immediately below do you (or those around you) believe to be true? I ask this because the tweets that follow place each of these statements in doubt (as a minimum, questioning the universally applicable manner in which these types of statement are often described or suggested).

Pitting each of the statements below against the tweets I’ve selected would consume pages of discussion. That is not my intention here. Instead, I encourage anyone who finds themselves reading one of the statements below and thinking “I assumed every tester believed that; that’s the best practice” to take 15 minutes from their day and begin to research. Research the person who published the tweet and the people they reference. Do this to understand why their views of testing differ from your own and ultimately following Christin Wiedemann’s advice of “Question your approach. Continuously challenge and question methods, techniques, and core beliefs. @c_wiedemann #CAST2012” (tweeted by Claire Moss (@aclairefication) at #CAST2012).

How many of the following statements do you believe to be true?

1. You should estimate the number of tests required for a release.  Once complete, you should report the number of tests passed and failed.

2. Create automated tests to replace your manual tests

3. Learn how to programme (write code) to further your testing career

4. Developers can’t find bugs in their own code

5. The expected behaviour of a system is defined by people we broadly refer to as Analysts

6. Adhering to a known testing standard will improve your chances of achieving your testing goal

7. Test automation is a long term investment

8. Outsourcing your testing will reduce your costs

9. When the build is green the product is of sufficient quality to release

10. Introducing a test tool will help you manage and improve your testing

11. Whenever possible, you should hire Testers with testing certifications

12. Analyse your bugs and give them relative priorities (e.g. P1, P2, etc.)

13. Create a set of templates that can be used by every project in your organisation

14. Write your automated tests using the same programming language that the developers use

15. Always test against sources of information that have been validated by the customer

Now read the tweets below. Do they alter how you think about the statements above?

Note: It is easy to misinterpret tweets, so if you are the author (or subject) of one of the tweets below and believe I have taken your tweet out of context, please feel free to contact me and I will post an update, or if you prefer, remove the tweet entirely.

1. You should estimate the number of tests required for a release.  Once complete, you should report the number of tests passed and failed.

Direct Link

18 Jul 2012

Alex Bantz ‏@alexjbantz

How many tests? is a silly & useless question. Better question is “How should you test this?” @michaelbolton #criticalthinking #CAST2012

2. Create automated tests to replace your manual tests

Direct Link

18 Jul 2012

Claire Moss ‏@aclairefication

You’ve taught your automation to be impatient? to be frustrated? All these things that people are good at doing? Need manual tests #CAST2012

3. Learn how to programme (write code) to further your testing career

Direct Link

18 Jul 2012

Michael Larsen ‏@mkltesthead

Not every tester should code. We end up taking awesome testers and turn some into awful programmers @testobsessed #CAST2012

4. Developers can’t find bugs in their own code

Direct Link

17 Jul 2012

Thomas Vaniotis ‏@tvaniotis

Devs who investigate even if imperfectly ARE testing. Belittling their contributions reduces one’s credibility #cast2012 @briangerhardt

5. The expected behaviour of a system is defined by people we broadly refer to as Analysts

Direct Link

17 Jul 2012

Claire Moss ‏@aclairefication

We are defining requirements by the act of filing a bug: a difference in the observed behavior and the expectation. @testobsessed#CAST2012

6. Adhering to a known testing standard will improve your chances of achieving your testing goal

Direct Link

17 Jul 2012

Geordie Keitt ‏@geordiekeitt

Standards are not incompatible with thinking. Unfortunately they are not incompatible with not thinking. #cast2012

7. Test automation is a long term investment

Direct Link

17 Jul 2012

Phil McNeely ‏@AdvInTesting

Don’t be afraid to have throwaway automation @mkltesthead #CAST2012

8. Outsourcing your testing will reduce your costs

Direct Link

16 Jul 2012

Michael Bolton ‏@michaelbolton

“Outsourcing often *really means* ‘outsourcing your waste'”. -Tripp Babbitt #CAST2012 #testing

9. When the build is green the product is of sufficient quality to release

Direct Link

16 Jul 2012

Tony Bruce ‏@tonybruce77

@testinggeek Paraphrased ‘Take green as information rather than a good pass’ #cast2012

10. Introducing a test tool will help you manage and improve your testing

Direct Link

18 Jul 2012

Anne-Marie Charrett ‏@charrett

TestLink & QTP encourage bad testing @adamgoucher So true#CAST2012

11. Whenever possible, you should hire Testers with testing certifications

Direct Link

16 Jul 2012

Ben Simo ‏@QualityFrog

“Certification doesn’t create zombie testers; but it is like spray-on credibility for them.” – @BenjaminKelly #CAST2012 #Testing

12. Analyse your bugs and give them relative priorities (e.g. P1, P2, etc.)

Direct Link

16 Jul 2012

Markus Gärtner ‏@mgaertne

Anyone with children knows there is no point in prio 1 or 2 bugs. You eventually have to fix both. @benjaminkelly #cast2012

13. Create a set of templates that can be used by every project in your organisation

Direct Link

16 Jul 2012

Wade Wachs ‏@WadeWachs

One flavor of the testing dead – the template weenie @benjaminkelly#cast2012

14. Write your automated tests using the same programming language that the developers use

Direct Link

16 Jul 2012

Anand and Komal ‏@testinggeek

Selecting tool set and language which make sense – don’t use same language as development for the sake of it – @adamgoucher#CAST2012

15. Always test against sources of information that have been validated by the customer

Direct Link

17 Jul 2012

Jason Coutu ‏@jcoutu

From @testobsessed “just cause we’re making things up, doesn’t mean we’re wrong” #CAST2012

Posted in Testing | Tagged: , , , , , | 5 Comments »

How to run a bug ‘lucky dip’ after your daily Scrum

Posted by Matt Archer on July 10, 2012

I remember being excited as a child when the opportunity of a ‘lucky dip’ presented itself. The game was simple. A selection of prizes would we wrapped in gift paper and hidden in a barrel of foam beads. One at a time, each child would then ‘dip’ their hand into the barrel and pull out a prize. The prize each child received was solely based on luck. The only certainty was that there was a prize in the barrel for everyone.

With a bug lucky dip, team members perform a similar ritual, the only difference is that there is rarely a barrel involved and team members are rewarded with a specific kind of prize; a bug to fix!

How I perform a bug lucky dip

Five minutes before the daily stand-up (daily scrum) is due to start, I glance at the task boards to gauge the number of bugs that have been recently added, but not yet fixed. If only a few bugs exist on the board, then there is no need for a bug lucky dip and I attend the stand-up as normal.

If, however, I notice a large number of bugs on our task board (especially, a large number on the left-hand side of the board), then it’s time to take action. On my way to the daily stand-up I take a detour via the task board and select as many bugs as there are members of the team. I take the cards that represent the selected bug with me to the daily stand-up.

Once everyone has finished their update at the stand-up I produce the bug cards and lay them face down on a table. If no table is available, I fan the cards in my hand with the text facing downwards. Each team member then takes it in turn to select a bug at random. The aim is then for each team member to fix their randomly selected bug at some point during the day. They decide when it’s convenient.

Why I like bug lucky dips

They’re fun: I find team members can’t help raise a smile at the point that lady-luck helps them pick a bug to fix, especially if that bug is perceived to be particularly simple or complex. I’m sure you can imagine the types of playful comments team members receive when they select a bug like “incorrect font size used on the welcome screen” vs. “memory leak in the mass-email component”. I know bug lucky dips introduce an element of theatre that could be avoided by just randomly assigning bugs to member of the team to fix, but I strongly believe that team bonds are formed just as much through play as through serious work.

They help promote collective code ownership: The bug somebody fixes is entirely based on chance, so you could find yourself making a change anywhere in the code. Similar to pairing, this is a great way for team members to become familiar with every corner of the code and hugely reducing the chance of knowledge walking out of the door when a team member leaves or moves to another team.

They’re quick: I’ve sat through some painfully long meetings in my time where the topic of conversation has been what bugs to fix next. Many of these meetings I’m sure could have been wrapped up in a fraction of the time. The good thing about a bug lucky dip is that it is quick. They skip the (often meaningless) discussions about bug priorities and move straight to the important part; what bugs are we fixing today? That’s not to say that I don’t consider the importance of one bug against another when I’m selecting cards for the lucky dip, I just don’t dwell on it. If people ever believe there is a more important bug on the board than the one they have picked, it’s not a problem; they just swap one for the other. No debate necessary.

They’re non-disruptive: Collaboration is an essential part of agile software development, but distraction and disruption are the enemy of the good. Good agile teams know they must continually review this balance by looking for opportunities to collaborate more effectively, whilst also eliminating unnecessary distractions and disruption. The good thing about a bug lucky dip is that the team has already been disrupted to attend the daily stand-up (a disruption that the majority of teams accept as essential). Staying an extra few minutes at the end of the stand-up rarely disrupts anyone’s day. It also helps streamline team collaboration as picking up an unfamiliar bug will often be followed by an offer of help at some point during the day.

They help keep the bug count low: Bug lucky dips are a mechanism for encouraging teams to keep their bug count low (an important practice that many teams forget). It’s easy to tag a bug lucky dip onto the end of every stand-up for a week and in the process knock 30-40 bugs off your backlog. It’s easy to fall into the trap of thinking that a large number of outstanding bugs is just putting off work until a later date (and everyone does that, right?), but as my recent article for The Testing Planet highlights, delaying the fixing of bugs has several negative effects of the team.

A final comment

Does this mean you only ever fix a given number of bugs each day? No. I always try to encourage a fix-them-when-you-find-them mentality when it comes to bugs, but sometimes this needs a helping hand. Running bug lucky dips is a good way of kick-starting this process or giving it a nudge when it falters.

Posted in Agile Testing, Scrum, Testing | Tagged: , , , , , , | 2 Comments »

Test Case Design with Classification Trees (Sample Book Chapter)

Posted by Matt Archer on March 7, 2012

Background

I recently started work on a new book. The title is still to be finalised, but the subject is clear; a practical look at popular test case design techniques. In this modern age of testing, you may be wondering why such a traditional subject needs a new book and that I would be better writing about my experiences with testing in an agile environment or test automation or exploratory testing. Without doubt these are print worthy topics, but I believe that the best people at performing these tasks are those with a solid understanding of test design and it is for this reason that I wanted to first focus on this topic.

I was in two-minds about publishing sample chapters, but I decided that it was something I wanted to do, especially when I felt the chapter in question added something to the testing body of knowledge freely available on the Internet. It is also for my own sanity. Writing a book is a lengthy endeavour, with few milestones that produce a warm glow until late into the process. Sharing the occasional chapter provides an often well needed boost.

The only caveat is that the chapter below is in need of a good Copy Editor. That said, I am happy with the content and messaging so any thoughts, comments and questions are welcome. Enjoy!

Introduction

A Classification Tree is a graphical technique that allows us to combine the results of Boundary Value Analysis and Equivalence Partitioning with a more holistic view of the software we are testing, specifically the inputs we plan to interact with and the relationships that exist between them.

Whenever we create a Classification Tree it can be useful to consider its growth in 3 stages – the root, the branches and the leaves. All trees start with a single root that represents an aspect of the software we are testing. Branches are then added to place the inputs we wish to test into context, before finally applying Boundary Value Analysis or Equivalence Partitioning to our recently identified inputs. The test data generated as a result of applying Boundary Value Analysis or Equivalence Partitioning is added to the end of each branch in the form of one or more leaves.

This combination of test data with a deeper understanding of the software we are testing can help highlight test cases that we may have previously overlooked. Once complete, a Classification Tree can be used to communicate a number of related test cases. This allows us to visually see the relationships between our test cases and understand the test coverage they will achieve.

There are different ways we can create a Classification Tree, including decomposing processes, analysing hierarchical relationships and brainstorming test ideas. Over the sections that follow, we will look at each approach and see they can be used.

Process decomposition

In addition to testing software at an atomic level, it is sometimes necessary to test a series of actions that together produce one or more outputs or goals. Business processes are something that fall into this category, however, when it comes to using a process as the basis for a Classification Tree, any type of process can be used. As a result, it is useful to think of processes in a way that not only conjure images of actions performed by a business, but also the last ‘wizard’ you used as part of a desktop application and that algorithm you wrote to sort a list of data.

The majority of processes we encounter can be directly or indirectly controlled by inputs. These are the things that we like to sniff out as testers and experiment with, not just because it satisfies our natural curiosity, but because one day this particular set of inputs may be encountered by somebody whose opinion matters and if they remain unchecked, who knows what their experience may be. All that we know about these inputs is that (in some way) they affect the outcome of the process we are testing. This may not sound like much of a connection, but it is one of the more frequently used heuristics for deciding the scope of a Classification Tree. Let us look at an example.

If you have ever worked in a commercial environment, you are likely to be familiar with the process of submitting an electronic timesheet. Let us assume that the purpose of this piece of testing is to check we can make a single timesheet entry. At a high level, this process involves assigning some time (input 1) against a cost codes (input 2). Based on these inputs, we now have enough information to draw the root and branches of our Classification Tree (Figure 1).

Fig 01 - Classification Tree for timesheet entry (root and branches only)Figure 1: Classification Tree for timesheet entry (root and branches only)

Whilst our initial set of branches may be perfectly adequate, there are other ways we could chose to represent our inputs. Just like other test case design techniques, we can apply the Classification Tree technique at different levels of granularity or abstraction. Imagine that as we begin to learn more about our timesheet system we discover that it exposes two inputs for submitting the time (an hour input and a minute input) and two inputs for submitting the cost code (a project code and an activity code). With our new found knowledge we could add a different set of branches to our Classification Tree (Figure 2), but only if we believe it will be to our advantage to do so. Neither of these Classification Trees is better than the other. One has more detail, upon which we can specify more precise test cases, but is greater precision what we want? Precision comes at a cost and can sometimes even hinder rather than help. What’s best for you and your project? Only you can decide.
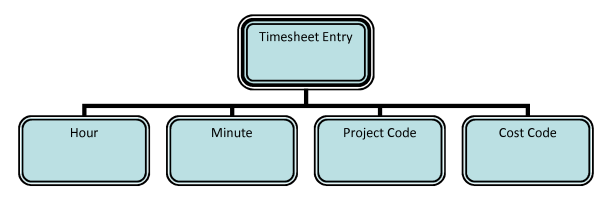
Fig 02 - Alternative Classification Tree for timesheet entry (root and branches only)

Figure 2: Alternative Classification Tree for timesheet entry (root and branches only)

Hierarchical relationships

The Classification Trees we created for our timesheet system were relatively flat (they only had two levels – the root and a single row of branches). And whilst many Classification Trees never exceed this depth, occasions exist when we want to present our inputs in a more hierarchical way. This more structured presentation can help us organise our inputs and improve communication. It also allows us to treat different inputs at different levels of granularity so that we may focus on a specific aspect of the software we are testing. This simple technique allows us to work with slightly different versions of the same Classification Tree for different testing purposes. An example can be produced by merging our two existing Classification Trees for the timesheet system (Figure 3).

Fig 03 - Classification Tree for timesheet entry (with hierarchy and mixed levels of granularity)Figure 3: Classification Tree for timesheet entry (with hierarchy and mixed levels of granularity)

We do not necessarily need two separate Classification Trees to create a single Classification Tree of greater depth. Instead, we can work directly from the structural relationships that exist as part of the software we are testing. One of the nice things about the Classification Tree technique is that there are no strict rules for how multiple levels of branches should be used. As a result, we can take inspiration from many sources, ranging from the casual to the complex.

With a little digging we may find that someone has already done the hard work for us, or at the very least provided us with some interesting food for thought. Unfortunately, there is no standard name for what we are looking for. It may be called a class diagram, a domain model, an entity relationship diagram, an information architecture, a data model, or it could just be a scribble on a whiteboard. Regardless of the name, it is the visual appearance that typically catches our attention. Let us look at an example (Figure 4) from the world of motor insurance.
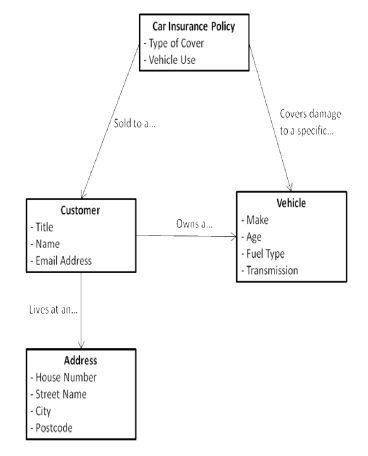
Fig 04 - Structural relationships from the world of motor insurance

Figure 4: Structural relationships from the world of motor insurance

Whilst it would be possible to define an automatable set of steps to convert the type of information in Figure 4 into a Classification Tree, this kind of mechanical transformation is unlikely to deliver a Classification Tree that fits our needs. A more practical approach is to decide which parts of the diagram we wish to mirror in our Classification Tree and which parts we are going to discard as irrelevant.

The inputs and relationships we select often depend upon the purpose of our testing. Let us look at two Classification Trees that both take inspiration from Figure 4, but greatly differ in their visual appearance. For the purpose of these examples, let us assume that the information in Figure 4 was created to support the development of a car insurance comparison website.

For our first piece of testing, we intend to focus on the fraud monitoring aspect of our website that checks whether the make, age, fuel type and transmission entered for a particular vehicle match those held by the National Car Records Bureau. For our second piece of testing, we intend to focus on the website’s ability to persist different addresses, including the more obscure locations that do not immediately spring to mind. Now take a look at the two classification trees in Figure 5 and Figure 6. Notice that we have created two entirely different sets of branches to support our different testing goals. In our second tree, we have decided to merge a customer’s title and their name into a single input called “Customer”. Why? Because for this piece of testing we can never imagine wanting to change them independently.
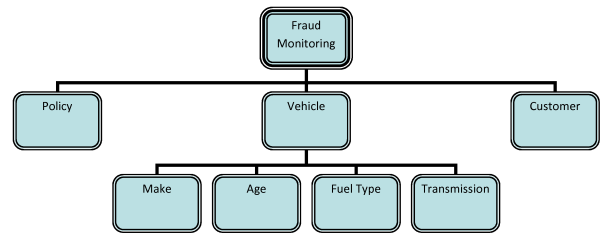
Fig 05 - Classification Tree to support the testing of fraud monitoring (root and branches only)

Figure 5: Classification Tree to support the testing of fraud monitoring (root and branches only)
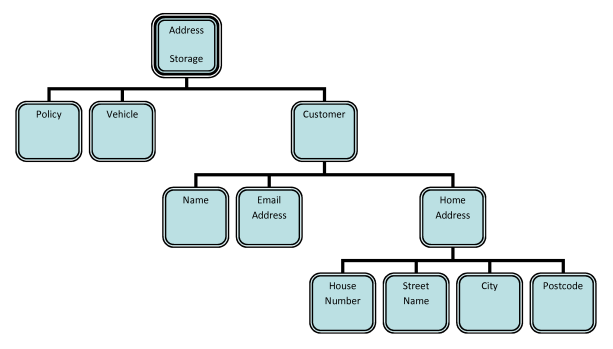
Fig 06 - Classification Tree to support the testing of address persistency (root and branches only)

Figure 6: Classification Tree to support the testing of address persistency (root and branches only)

Fear not if you rarely encounter a class diagram, a domain model or anything similar. There are many other places we can look for hierarchical relationships. You never know, they may even be staring you right in the face.

If the software we are testing has a graphical interface, this can be a great place for inspiring the first cut of a Classification Tree. Imagine for a moment that we have been asked to test the sensitivity analysis module of a new pension scheme management system. The premise of the module is simple. How could unexpected economic and demographic events affect the performance of the pension scheme? Based upon discussions with the intended users of the software, these events have been grouped into two categories, which have been duly replicated in user interface design (Figure 7). Now take a look at one possible Classification Tree for this part of our investment management system (Figure 8). In just the same way we can take inspiration from structural diagrams, we can also make use of graphical interfaces to help seed our ideas.
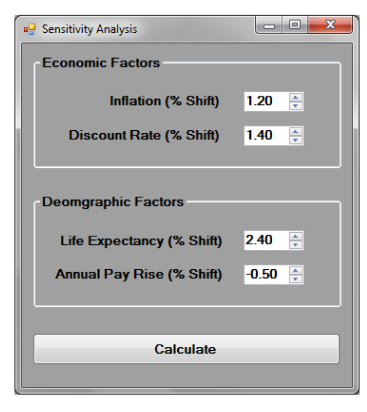
Fig 07 - Graphical Interface for Sensitivity Analysis ModuleFigure 7 – Graphical Interface for Sensitivity Analysis Module

Fig 08 - Classification Tree for Sensitivity Analysis Module

Figure 8 – Classification Tree for Sensitivity Analysis Module

Of course, if we only relied on graphical interfaces and structural diagrams to help organise our Classification Trees, there would be a sad number of projects that would never benefit from this technique. There are many other concrete examples we could discuss, but for now I will leave you with some general advice. Anytime that you encounter something that implies a relationship, such as “A is a type of B”, “X is made up of Y” or “For each M there must be at least one N” just ask yourself, would my Classification Tree be easier to draw, communicate and maintain if it mirrored that relationship? If the answer is yes, you are onto a winner.

Applying Equivalence Partitioning or Boundary Value Analysis

Assuming we are happy with our root and branches, it is now time to add some leaves. We do this by applying Boundary Value Analysis or Equivalence Partitioning to the inputs at the end of our branches. For the Classification Tree in Figure 9 this means the application of either technique to the inputs of Hours, Minutes and Cost Code, but not to the input of Time, as we have decided to express it indirectly by Hours and Minutes.

Fig 09 - Classification Tree to support the testing of timesheet entry (root and branches only)

Figure 9 – Classification Tree to support the testing of timesheet entry (root and branches only)

Equivalence Partitioning focuses on groups of input values that we assume to be “equivalent” for a particular piece of testing. This is in contrast to Boundary Value Analysis that focuses on the “boundaries” between those groups. It should come as no great surprise that this focus flows through into the leaves we create, affecting both their quantity and visual appearance. Identifying groups and boundaries can require a great deal of thought. Fortunately, once we have some in mind, adding them to a Classification Tree could not be easier.

For no other reason than to demonstrate each technique, we will apply Boundary Value Analysis to the Minutes input, and Equivalence Partitioning to the Hours and Cost Code inputs. One possible outcome of applying these techniques is shown below.

Cost Code Input: Two groups

Group 1 – Any existing code combination

Group 2 – Any non-existent code combination

Hours Input: Two groups

Group 1 – Negative hours

Group 2 – Zero or more hours

Minutes Input: 2 Boundaries

Boundary 1 – Lower boundary (zero minutes)

Boundary 2 – Upper boundary (sixty minutes)

Now we have the results of each technique it is time to start adding them to our tree. For any input that has been the subject of Equivalence Partitioning this is a single step process. Simply find the relevant branch (input) and add the groups identified as leaves. This has the effect of placing any groups beneath the input they partition. For any input that has been the subject of Boundary Value Analysis, the process is a little longer, but not by much. In a similar way to Equivalence Partitioning, we must first find the relevant branch (input), but this time it is the boundaries that we need to add as leaves rather than the groups. The process is completed by adding two leaves under each boundary – one to represent the minimum meaningful amount below the boundary and another to represent the minimum meaningful amount above. The complete tree can be seen in Figure 10.
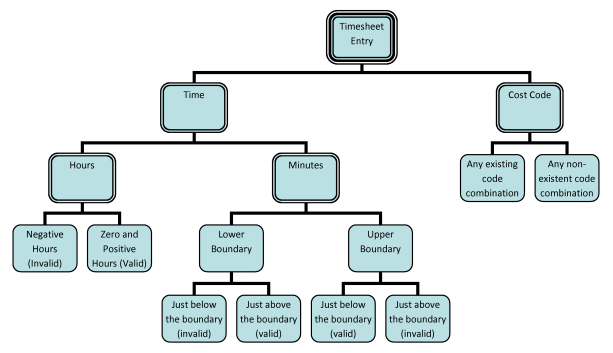
Fig 10 - Complete classification tree for timesheet entry (root, branches and leaves)

Figure 10: Complete classification tree for timesheet entry (root, branches and leaves)

Specifying test cases

By this stage, if everything has gone to plan we should be looking at a beautiful Classification Tree, complete with root, branches and leaves. It is an exciting milestone, but we still have some big decisions left to make. Most importantly, what are our test cases going to look like?

To specify test cases based upon a Classification Tree we need to select one leaf (a piece of test data) from each branch (an input the software we are testing is expecting). Each unique combination of leaves becomes the basis for one or more test cases. We can present this information in whatever format we like. One way is as a simple list, similar to the one shown below that provides examples from the Classification Tree in Figure 10 above.

Leaf combination 1

Hours = Negative

Minutes = Just above the lower boundary

Cost Code = Any existing code combination

Leaf combination 2:

Hours = Positive

Minutes = Just below the upper boundary

Cost Code = Any existing code combination

Leaf combination 3:

Hours = Negative

Minutes = Just below the lower boundary

Cost Code = Any non-existent code combination

Whilst the list format above is OK for a quick example, presenting this information independently of the associated Classification Tree can make it difficult to see which combinations we have decided to include, compared to those we have chosen to ignore. This in turn makes it harder to see our planned test coverage and also react to any changes to the software we are testing.

For this reason, a popular method for adding test cases to a Classification Tree is to place a single table beneath the tree, into which multiple test cases can be added, typically one test case per row. The table is given the same number of columns as there are leaves on the tree, with each column positioned directly beneath a corresponding leaf. Additional columns can also be added to preserve any information we believe to be useful. A column to capture the expected result for each test case is a popular choice.

Now we have a decision to make. Are we going to specify abstract test cases or concrete test cases? Or to put it another way, are we going to specify exact values to use as part of our testing or are we going to leave it to the person doing the testing to make this choice on the fly? Like many other decisions in testing, there is no universally correct answer, only what is right for a specific piece of testing at a particular moment in time.

To specify abstract test cases is relatively easy. Each unique leaf combination maps directly to one test case, which we can specify by placing a series of markers into each row of our table. Figure 11 contains an example based upon the three leaf combinations we identified a moment ago.
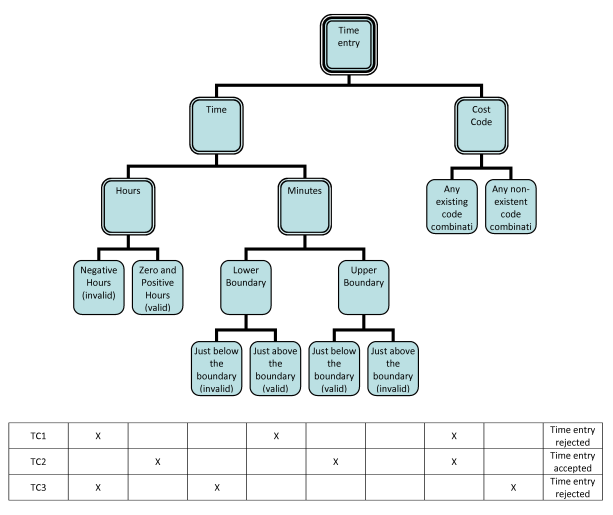
Fig 11 - Abstract Test Cases for timesheet entry

Figure 11: Abstract Test Cases for timesheet entry

You will notice that there are no crosses in one of our columns. In this particular instance, this means that we have failed to specify a test case that sets the Minute input to something just above the upper boundary. To call it an oversight may be unfair. It may have been a conscious choice. Either way, by aligning our test case table with our Classification Tree it is easy to see our coverage and take any necessary action.

Now we have seen how to specify abstract test cases using a Classification Tree, let us look at how to specify their concrete alternatives. The easiest way to create a set of concrete test cases is to replace the existing crosses in our table with concrete test data. This has the effect of providing exact values for each test case. It also gives us the opportunity to create multiple concrete test cases based upon a single combination of leaves.

Notice in the test case table in Figure 12 that we now have two test cases (TC3a and TC3b) both based upon the same leaf combination. Without adding additional leaves, this can only be achieved by adding concrete test data to our table. It does go against the recommendation of Equivalence Partitioning that suggests just one value from each group (or branch) should be sufficient, however, rules are made to be broken, especially by those responsible for testing.
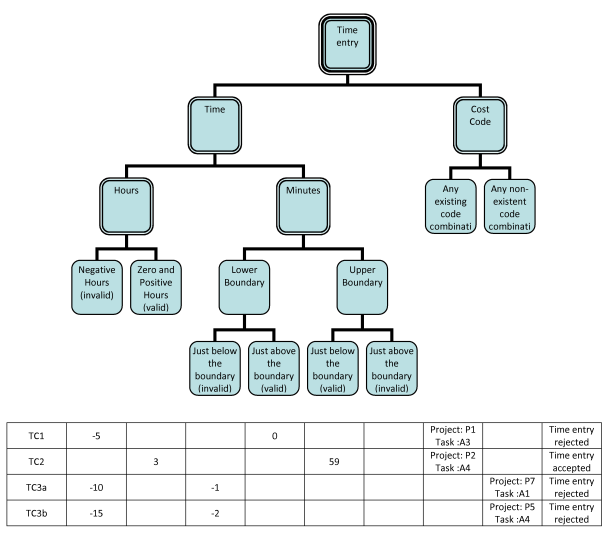
Fig 12 - Concrete Test Cases for timesheet entry

Figure 12: Concrete Test Cases for timesheet entry

In Figure 12, notice that we have included two concrete values into each cell beneath the Cost Code branch – one for the Project Code input and one for the Task Code input. This is because when we drew our tree we made the decision to summarise all Cost Code information into a single branch – a level of abstraction higher than the physical inputs on the screen. Now we have made the switch to concrete test cases, we no longer have the luxury of stating that any existing code combination will do. We must provide exact test data for each input and adding multiple values to a cell is one way to accomplish this goal. An alternative is to update our Classification Tree to graphically represent the Project Code and Task Code as separate branches, however, this would result in a larger tree which we may not necessarily want. There is, of course, a compromise. There is nothing to stop us from specifying part of a test case at an abstract level of detail and part at a concrete level of detail. The result can be the best of both worlds, with greater precision only included where necessary.
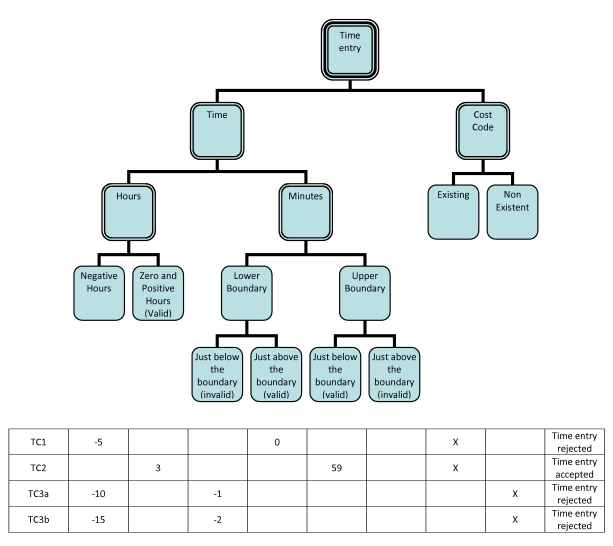
Fig 13 - Hybrid Test Cases (half concrete value, half abstract values) for timesheet entry

Figure 13: Hybrid Test Cases (half concrete value, half abstract values) for timesheet entry

One final option is to place the concrete test data in the tree itself. Notice how in the Figure 14 there is a value in brackets in each leaf. This is the value to be used in any test case that incorporates that leaf. It does mean that we can only specify a single concrete value for each group (or a pair for each boundary) to be used across our entire set of test cases. If this is something that we are satisfied with then the added benefit is that we only have to preserve the concrete values in one location and can go back to placing crosses in the test case table. This does mean that TC3a and TC3b have now become the same test case, so one of them should be removed.
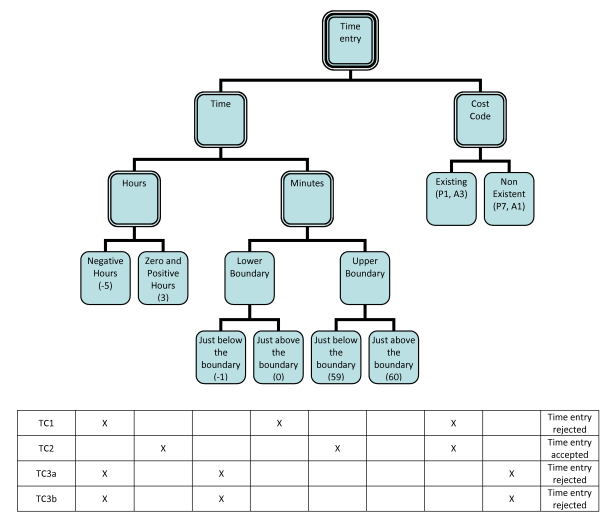
Fig 14 - Concrete Test Cases (with values in leaves) for timesheet entry

Figure 14: Concrete Test Cases (with values in leaves) for timesheet entry

Brainstorming test cases first

In much the same way that an author can suffer from writer’s block, we are not immune from the odd bout of tester’s block. Drawing a suitable Classification Tree on a blank sheet of paper is not always as easy as it sounds. We can occasionally find ourselves staring into space, wondering what branch or leaf to add next, or whether we have reached an acceptable level of detail.

When we find ourselves in this position it can be helpful to turn the Classification Tree technique on its head and start at the end. One of the benefits of the Classification Tree technique is that it allows us to understand the coverage of a number of interrelated test cases, but by creating a Classification Tree first we assume (possibly without even realising) that we have a vague idea of the test cases we ultimately plan to create. In reality, this is not always the case, so when we encounter such a situation a switch in mind-set can help us on our way.

In other walks of life people rely on techniques like clustering to help them explore concrete examples before placing them into a wider context or positioning them in a hierarchical structure. You would be forgiven for thinking that a Classification Tree simply provides structure and context for a number of test cases, so there is a lot to be said for brainstorming a few test cases before drawing a Classification Tree. Hopefully we will not need many, just a few ideas and examples to help focus our direction before drawing our tree.

It is worth mentioning that the Classification Tree technique is rarely applied entirely top-down or bottom-up. In reality, the outline of a tree is often drawn, followed by a few draft test cases, after which the tree is pruned or grown some more, a few more test cases added, and so on and so on, until finally we reach the finished product. But our work does not stop here. Due to their style, Classification Trees are easy to update and we should take full advantage of this fact when we learn something new about the software we are testing. This often occurs when we perform our test cases, which in turn triggers a new round of updates to our Classification Tree.

Pruning a cluttered tree

As we draw a Classification Tree it can feel rewarding to watch the layers and detail grow, but by the time we come to specify our test cases we are often looking for any excuse to prune back our earlier work. Remember that we create Classification Trees so that we may specify test cases faster and with a greater level of appreciation for their context and coverage. If we find ourselves spending more time tinkering with our tree than we do on specifying or running our test cases then maybe our tree has become too unwieldy and is in need of a good trim.

If we have chosen to represent one or more hierarchal relationships in our tree, we should ask ourselves whether they are all truly necessary. A tree with too much hierarchy can become difficult to read. By all means, we should add hierarchal relationships where they improve communication, but we should also aim to do so sparingly.

If Boundary Value Analysis has been applied to one or more inputs (branches) then we can consider removing the leaves that represent the boundaries. This will have the effect of reducing the number of elements in our tree and also its height. Of course, this will make it harder to identify where Boundary Value Analysis has been applied at a quick glance, but the compromise may be justified if it helps improve the overall appearance of our Classification Tree.

If we find ourselves with a Classification Tree that contains entirely concrete inputs (branches), we should ask ourselves whether we need that level of precision across the entire tree. We may find that some inputs have been added out of necessity (such as mandatory inputs) and potentially indirectly related to our testing goal. If this is the case we can consider combining multiple concrete branches into a single abstract branch. For example, branches labelled “title”, “first name” and “surname” could be combined into a single branch labelled “person’s name”. A similar merging technique can also be applied (to both concrete and abstract) branches when we do not anticipate changing them independently.

Implicit test cases

When we find ourselves short of time there is always the option of forfeiting the ubiquitous test cases table for something that requires the bare minimum of effort. Rather than using a tabular format (as shown in the previous section) we can instead use a coverage target to communicate the test cases we intend to run. We do this by adding a small note to our Classification Tree, within which we can write anything we like, just as long as it succinctly communicates our target coverage. Sometimes just a word will do, other times a more lengthy explanation is required. Let us looks at an example to help understand the principle.

Imagine for a moment that we are testing a new charting component that can display data based on either two or three axis. It is the first time the charting component has ever been tested so with the intention of finding any obvious problems as quickly as possible we decide to draw a Classification Tree (Figure 15) around two of the broadest inputs we can control – the type of chart (bar, line or pie) and the number of axis (two or three).

We now need to decide what test cases we intend to run, but rather than presenting them in a table, we are going to express them as a coverage target. Remember, in this example we are not looking for a thorough piece of testing, just a quick pass through all of the major features. Based upon this decision, we need to describe a coverage target that meets our needs. There are countless options, but let us take a simple one for starters; “Test every leaf at least once”.
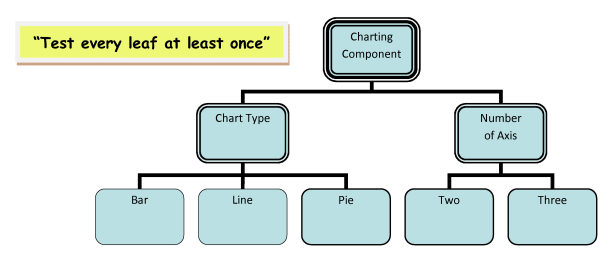
Fig 15 - Classification Tree for charting component (with coverage target note)

Figure 15 – Classification Tree for charting component (with coverage target note)

That’s it. We have now defined our test cases (implicitly) for this piece of testing. But how do we (or anyone else) know what test cases to run. We know by applying the coverage target in real-time as we perform the testing. If we find ourselves missing the test case table we can still see it, we just need to close our eyes and there it is in our mind’s eye. Figure 16 below shows one possible version of our implied test case table.

Fig 16 - Classification Tree for charting component (with example test case table)

Figure 16 – Classification Tree for charting component (with example test case table)

Now imagine for a moment that our charting component comes with a caveat. Whilst a bar chart and a line chart can display three-dimension data, a pie chart can only display data in two-dimensions. With our new found information, we may decide to update our coverage note; “Test every leaf at least once. Note, a pie chart cannot be 3D”.

As we interact with our charting component this coverage note can be interpreted in two ways. As we go about testing every leaf at least once, we may avoid a 3D pie chart because we know it is not supported. Conversely, we may acknowledge that a 3D pie chart is not supported, but try it anyway to understand how the component handles this exception. Leaving this choice until the moment we are testing is not necessarily a bad thing, we can make a judgement call at the time. However, if we want to be more specific we can always add more information to our coverage note; “Test every leaf at least once. Note, a pie chart cannot be 3D (do not test)”.

Colour-coded Classification Trees

Whilst not always necessary, a splash of colour can make a great addition to a Classification Tree. It allows us to add an extra dimension of information that would not be possible if we stuck to a single colour.

A popular use of colour is to distinguish between positive and negative test data. In summary, positive test data is data that we expect the software we are testing to happily accept and go about its merry way, doing whatever it is supposed to do best. We create test cases based on this kind of data to feel confident that the thing we are testing can do what it was indented to do. Imagine a piece of software that will tell you your age if you provide your date of birth. Any date of birth that matches the date we are testing or a date in the past could be considered positive test data because this is data the software should happily accept.

Negative test data is just the opposite. It is any data that the thing we are testing cannot accept, either out of deliberate design or it doesn’t make sense to do so. We create test cases based on this kind of data to feel confident that if data is presented outside of the expected norm then the software we are testing doesn’t just crumble in a heap, but instead degrades elegantly. Returning to our date of birth example, if we were to provide a date in the future then this would be an example of negative test data. Why? Because the creators of our example have decided that through a deliberate design choice it will not accept future dates as for them it does not make sense to do so.

Combining these concepts with a Classification Tree could not be easier. We just need to decide whether each leaf should be categorised as positive or negative test data and then colour code them accordingly. A colour coded version of our timesheet system classification tree is shown in Figure 17. Positive test data is presented with a green background, whilst negative test data is presented with a red background. By marking our leaves in this way allows us to more easily distinguish between positive and negative test cases.
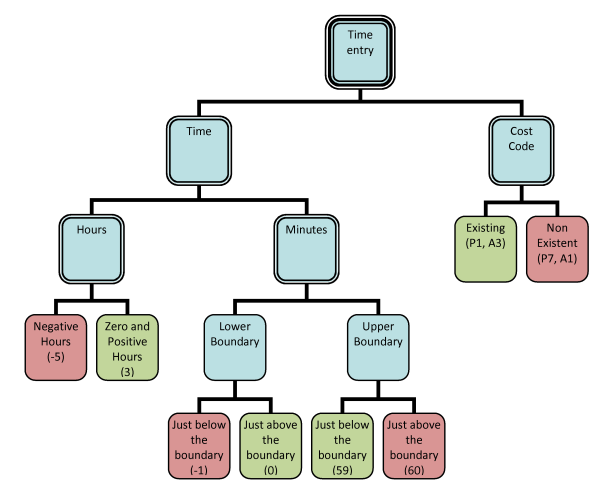
Fig 17 - Colour-coded Classification Tree for timesheet entry

Figure 17: Colour-coded Classification Tree for timesheet entry

Summary

In this chapter, we have seen;

– How it is useful to consider the growth of a Classification Tree in 3 stages – the root, the branches and the leaves.

– How inspiration for Classification Trees can be taken from decomposing processes, analysing hierarchical relationships and brainstorming test ideas.

– How Classification Trees can support the creation of abstract test cases, concrete test cases and a mixture of both.

– How to identify Classification Trees that may benefit from pruning.

– How to implicitly preserve and communicate test cases with coverage target notes.

– How to add colour to a Classification Tree to improve communication.

Posted in Testing | Tagged: , , , , , , | 3 Comments »

Risk-Based, Cross-Browser Testing with Scrum

Posted by Matt Archer on November 8, 2011

Risk Based Testing

In its heyday, risk-based testing1 was the buzz-word of the industry; every tester was talking about it and every project had it as part of their testing strategy (even if it was only given lip-service in a superficial strategy document somewhere).

Today, it is all about being lean2 and agile3 – testing early, testing often and having a zero tolerance to defects. It’s a good way of working, but have the guiding principles associated with agile software development made us lose track of one of the most important facts of software testing? That ensuring quality by testing everything is impossible. That even at its best, testing is a risk reduction exercise and different projects have wildly different tolerances to risk.

Many of the Scrum teams I join follow a delivery pattern that is made up of a number of internal releases, followed by a final public release. In terms of timeframes, this could mean an internal release every 2 weeks over the course of 4 months (for example) before a final public release at the end of that 4 month period. When it comes to planning the testing effort, this delivery pattern introduces an extra dimension that is rarely discussed on agile projects of this nature. That dimension is time.

In situations such as these, our first option is to ignore the total amount of time available to test (typically multiple sprints’ worth) and pretend that the software produced each sprint will be publically released. By working in this way we force ourselves to verify every aspect of quality during each sprint and to the best of our ability keep the risk of unknown bugs to a minimum.

Our second option is to investigate this extra dimension and postpone testing some aspects of quality until a later sprint, consciously accepting the level of risk associated with that decision.

You’re eyes are not deceiving you; I did just hint at an approach to testing on an agile project whereby every aspect of quality isn’t tested every sprint. I’ve had this conversation with people face-to-face so I can imagine what some of you may be thinking.

“You’re transitioning from a waterfall model and you’re currently going through the ‘w-agile’ phase” 4

“You’re not taking advantage of test automation properly” 5

“You need to get testers involved earlier in the lifecycle”

The majority of comments I receive suggest that teams who delay some of their testing until a later sprint are suffering from a process failure that should be fixed by adopting a new way of working. But does every team that delays testing need to be fixed? Or are they already working successfully by deliberately applying a risk-based approach to testing based upon their available time, tools, skills and project’s tolerance to risk? Have they, quite rightly, adapted their testing to their context6?

What follows is an explanation of risk-based browser-compatibility testing on a Scrum project. I must stress that there are countless ways of applying risk-based testing, each with their own subtle twists and nuances. The approach below is one I have found useful in the past. I hope you find it useful in creating your own unique way of working.

Estimating Risk

At the heart of risk-based testing is the idea that we cannot test everything in every possible way and consequently some things must be tested less thoroughly and/or frequently than others. With this idea in mind, which browsers should be near the top of our testing to-do list and which browsers can be left untested until a later sprint, tested less frequently or tested less thoroughly?

To answer this question, we need to decide how to estimate the level of risk associated with each browser. The majority of techniques used to estimate risk are based upon two parameters. Wikipedia7 nicely combines these two parameters into the formula below. By introducing this formula, I am able to replace “risk” (a fairly vague and ambiguous concept) with two scales upon which I can more easily rank one browser against another.

Risk = (probability of the accident occurring) x (expected loss in case of the accident)

When it comes to estimating the “expected loss” caused by accidentally releasing a bug into the wild I like to use the popularity of a browser. I use this indicative measure because I believe a bug that presents itself in a high usage browser (such as IE8) is worse than a bug of similar priority that presents itself in a low usage browser (such as IE5.5). I also like this measure because of the correlation that typically exists between the number of users who enjoy a successful visit to a website and its reason for existing (direct product sales, lead generation or positive brand awareness, for example).

Whilst an important indicator, I rarely find a browser’s popularity is enough to prioritise it against its peers, especially when working with multiple browsers with similar usage profiles. As an example, think back a couple of years to when IE6, IE7 and IE8 each held a similar market share (~10%-15% in late 2009). Now image that you had been asked to test an AJAX intensive website with an extremely rich and interactive UI. If you were going to get a free cup of coffee for every P1 browser compatibility bug you found, but only had 30 minutes to test, where would you start? I’d choose IE6 every time and I don’t know many testers who wouldn’t (other than those who don’t like free coffee!). It is for this reason that I believe the “probability” of a browser compatibility bug existing is also an important part of prioritising the testing of one browser over another.

Unlike “expected loss”, I like to consider a variety of factors when estimating the “probability” of a bug being discovered in a website whilst using a particular browser. Examples include the age of a browser, the default browser used by the team and any similarities between the browser I am currently estimating and the list of browsers already marked as a high priority or already tested. My reasons for these choices are listed below.

I think about the age of a browser because both older browsers and cutting edge browsers often work in ways that are less frequently considered whilst designing a website.

I think about the default browser(s) used by the team because people will often stumble across (and fix) compatibility issues with their own browser, reducing the chance of finding compatibility issues with that browser during dedicated browser compatibility testing.

I also think about the similarities between the browser I am evaluating and the list of browsers that I have already deemed to be high priority or have already tested in a previous sprint(s). Why? Because if I have decided to thoroughly test Firefox 3.6.13, I am unlikely to find additional bugs if I test Firefox 3.6.14, compared to if I tested a completely different browser, potentially on an entirely different operating system, such as Safari 5 on a Mac OS.

Armed with this approach to estimating the potential impact caused by a browser compatibility bug and the probability of such a bug existing, I can rank the different browsers I want to consider for testing. At this stage, my preference is to use “high”, “medium” and “low” categories rather than absolute values. The table below contains example estimates for each browser. I must stress that such a table is specific to a particular project. To highlight this point, consider the range of browsers a website may encounter if it was built for public consumption versus another website built for internal use within a large corporate organisation. Before even starting to prioritise one browser against another, these two projects are likely to have very different lists of browsers that they intend to support.

Browser

Probability of Discovering a Bug

Potential Impact if a Bug Exists

Risk

Internet Explorer 8

Medium

High

High

Internet Explorer 7

High

Medium

High

Firefox 6

Medium

Medium

Medium

Internet Explorer 9

Medium

Medium

Medium

Safari 5

Medium

Medium

Medium

Chrome 13

Low

High

Low

Firefox 5

Low

High

Low

Internet Explorer 6

High

Low

Low

Firefox 3.6

Low

Medium

Very Low

Chrome 12

Low

Medium

Very Low

Firefox 4

Low

Low

Very Low


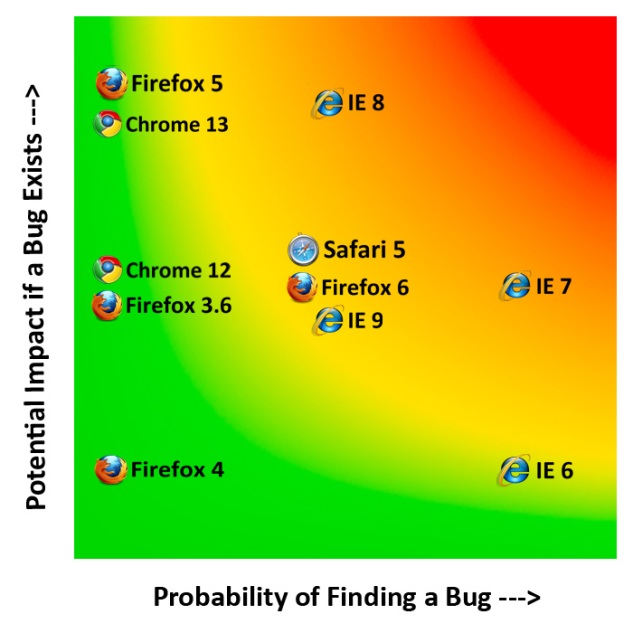
I sometimes find it useful to show the same information graphically to help me explain a particular test strategy to senior management or other members of the team. The same information as in the table above is also represented graphically below. I like this style of presentation due to the colours. If you have one or more browsers in the red or amber area then this is probably where you should turn your thoughts first. Browsers in the green area can then follow, as desired.

Risk-Based Browser-Compatibility Matrix

Sprint Planning and Release Planning

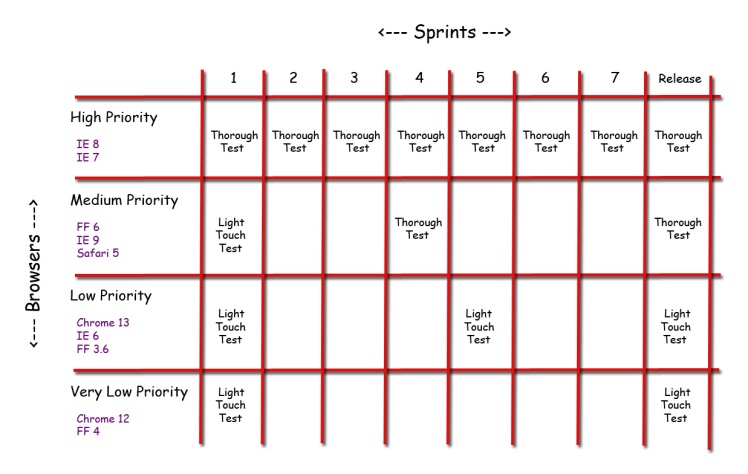
Now comes the tricky part. Based upon their associated risk, how often should each browser be tested and to what level of thoroughness? As I suggested at the beginning of this post, if a website will not be publically released until several sprints into the future, we have a greater number of options available.

At one end of the spectrum are projects that set aside resources every sprint to test every browser for incompatibility bugs, ranging from the blatantly obvious to single pixel misalignments. This is an extremely risk averse, but also very costly approach to understanding what browser compatibility bugs exist. Someone related to this project is likely to have high expectations when it comes to browser compatibility.

At the other end of the spectrum are projects that do not perform any browser compatibility testing until the final sprint before a public release, at which point their testing is limited to traversing one or two paths using the top three browsers, whilst scanning for obvious visual anomalies. These projects are likely to have a high tolerance to risk (whether they have consciously chosen to accept it is another matter).

Most of the teams I work with find themselves somewhere in the middle, but typically not before a healthy series of arguments and counter arguments take place in favour of different testing profiles, each with their own level of risk. Below is an example of how I like to represent this information as a consensus is thrashed out within the team. In my experience, low-tech works best, so grab a white board and some markers and talk through the various options that are compatible with your available time, tools, skills and project’s tolerance to risk.

Testing Profile for Browser Compatibility Testing Across Multiple Sprints (Scrum)

Finally, remember that whilst this kind of testing profile deliberately spans multiple sprints, it is not intended to be fixed in stone during sprint 1 and religiously adhered to until the website is externally released. Truth be told, your original estimates are likely to be wrong, so be prepared to tweak the priority associated with each browser from one sprint to the next.

References

1 – An article written by James Bach on risk based testing.

http://www.satisfice.com/articles/hrbt.pdf

2 – A blog post by Alan Richardson (a.k.a. “the Evil Tester”) in which he describes how to apply one of the principles of lean (avoiding waste) to testing.

http://www.eviltester.com/index.php/2008/02/20/some-notes-on-software-testing-waste-my-lean-perspective/

3 – A good overview of agile testing by Elisabeth Hendrickson.

http://testobsessed.com/wp-content/uploads/2011/04/AgileTestingOverview.pdf

4a – A blog post by Rachel Davies in which she describes some of the signs that indicate a team could be following ‘w-agile’.

http://agilecoach.typepad.com/agile-coaching/2010/03/agile-or-wagile.html

4b – Another blog post about ‘w-agile’, this time by Rebecca Porterfield on the ThoughtWorks community site. In this post Rebecca takes the position that there is both ‘good’ and ‘bad’ ‘w-agile’. A belief I share based upon my own agile transformation experiences.

http://community.thoughtworks.com/posts/ffc85995c8

5 – A blog post by Mike Cohn in which he describes an approach to test automation that is frequently used on agile projects. Notice, similar to other test automation models proposed for agile projects, the focus is on ‘functional’ test automation. How are the non-functional aspects tested?  If ‘manually’ is the answer, this is where risk based testing can help.

http://blog.mountaingoatsoftware.com/the-forgotten-layer-of-the-test-automation-pyramid.

6 – An introduction to context-driven testing, at the heart of which is the principle that there are no testing best practices.

http://www.context-driven-testing.com

7 – The Wikipedia page for ‘Risk’.

http://en.wikipedia.org/wiki/Risk#Mathematical_formulations

Posted in Agile Testing, Scrum, Testing | Tagged: , , , , , , , , , , , , , | Leave a Comment »

Sharing BDD specifications between testers and developers using StoryQ

Posted by Matt Archer on July 3, 2011

From what I’ve seen, teams that decide to follow an agile way of working quite quickly manage to adopt the frequently cited agile practices, apart from one; the multi-skilled team1. As a result, rather than working in a way where anyone can (and is encouraged to) do anything to help the project succeed, many projects still have what they refer to as “developers” and “testers”. Don’t get me wrong, from what I’ve seen this isn’t an agile adoption killer, but it does bring with it some challenges in terms of ownership / responsibility (call it what you will), around some of the newer agile practices where things are still evolving2, like Behaviour Driven Development (BDD).

When it comes to adoption, BDD can lead to some interesting discussions due its wide reaching influence. As a practice, BDD can help agree the scope with the customer, act as requirements for developers and help testers verify the solution. It is this cross cutting nature that can leave multiple members of the team thinking it is their practice to champion and adopt. Individuals from any corner of the team could easily find themselves at a conference (supposedly focused on their specialism) listening to a talk on BDD, in some instances blissfully unaware that other members of their team have received a similar presentation on BDD, just with a subtly different spin.

So if we focus solely on the test creation part of BDD, who is responsible for creating the automated test to prove that a feature has been built to the agreed specification?  My opinion is that both developers and testers have their part to play, each with their own unique skills to contribute, but to date I haven’t seen a truly integrated effort between a group of developers and a group of testers to implement BDD, at least not one where everyone helps both define and verify specifications. What follows below is a way of working that I plan to try when I get the chance. If you have tried something similar I would love to hear from you.

Regardless of who ultimately creates the automated test, every BDD cycle needs to start with a specification. A simple example is included below.

In order to keep my financial information secure

As a registered user

I want to be asked for a username and password when I visit my online banking website

With scenario – “Incorrect password”

Given a registered user

When they enter an incorrect password

Then they should be informed that they have not been granted access

Once we have a specification, we need to represent that specification in a tool that can ultimately make it “executable”. I’ve opted to use StoryQ4 (shown below is an abstract class I have written to represent my specification).

    [TestClass]
    abstract public class UserLoginSpec
    {
        [TestMethod]
        public void LoginAsAnInvalidUser()
        {
            new Story("User Login")
            .InOrderTo("Keep my personal financial information secure")
            .AsA("Registered User")
            .IWant("To be asked for a username and password when I visit my online banking website")
            .WithScenario("Incorect password")
            .Given(ARegisteredUser)
            .When(TheyEnterAnIncorrectPassword)
            .Then(TheyShouldSeeAnErrorMessageStatingTheyHaveNotBeenGrantedAccess)
            .Execute();
        }

        abstract public void ARegisteredUser();
        abstract public void TheyEnterAnIncorrectPassword();
        abstract public void TheyShouldSeeAnErrorMessageStatingTheyHaveNotBeenGrantedAccess();
    }

Code Sample 1 – UserLogin Specification

Anyone who has used StoryQ, or any other BBD framework for that matter, will know that we now need to write some methods to wire our specification to our solution. For arguments sake, let’s assume we’re creating a Microsoft ASP.NET MVC application. Who would be the best person in the team to implement these methods – a developer or a tester?

In this situation, I can’t help thinking, why not both? Why not let developers utilise their expertise to implement our specification methods in a way that interacts with our solution below the UI (mocking where necessary), whilst leaving the “testers” to use their expertise to implement our specification methods in a way that interacts with our solution above the UI? Both sets of methods could implement the same specification, so the project only has to maintain one version of what the application should do (a single version of the truth).

I’ve included below an example of what this would look like in code. Notice how both test classes inherit from the same specification class and override each method to create their own version of the test (above and below the UI). I’ve used the sample ASP.NET MVC application as the basis for my example. In case you’re wondering, the above UI version of the test is using the Selenium3 API to provide UI level automation.

    public class UserLogin_BelowUI : UserLoginSpec
    {
        AccountController accountController;
        LogOnModel logOnModel;

        public override void ARegisteredUser()
        {
            logOnModel = new LogOnModel()
            {
                UserName = "someUser",
                Password = "badPassword",
                RememberMe = false
            };
        }

        public override void TheyEnterAnIncorrectPassword()
        {
            accountController = new AccountController()
            {
                FormsService = new MockFormsAuthenticationService(),
                MembershipService = new MockMembershipService()
            };

            accountController.LogOn(logOnModel, null);
        }

        public override void TheyShouldSeeAnErrorMessageStatingTheyHaveNotBeenGrantedAccess()
        {
            Assert.AreEqual("incorrect password", accountController.ModelState[""].Errors[0].ErrorMessage);
        }
    }

Code Sample 2 – UserLogin Below UI Test


    public class UserLogin_AboveUI : UserLoginSpec
    {
        UserData testUserData;

        public override void ARegisteredUser()
        {
            testUserData = TestUserFactory.GetUserWithIncorrectPassword();
        }

        public override void TheyEnterAnIncorrectPassword()
        {
            browser.Click("link=Log On");

            browser.Type("UserName", testUserData.Username);
            browser.Type("Password", testUserData.Password);

            browser.Click("//input[@value='Log On']");
        }

        public override void TheyShouldSeeAnErrorMessageStatingTheyHaveNotBeenGrantedAccess()
        {
            Assert.IsTrue(browser.IsTextPresent("incorrect password"));
        }
    }

Code Sample 3 – UserLogin Above UI Test

.

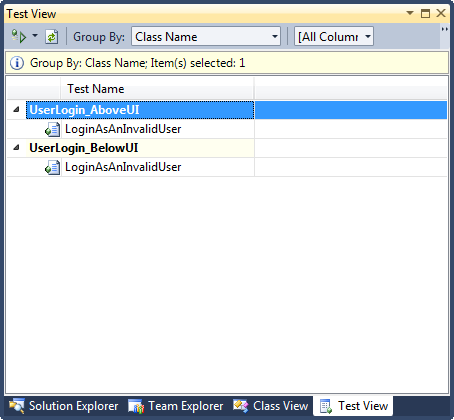
Visual Studio Test View Showing StoryQ Tests Above and Below The User Interface

UserLogin Above UI Test and UserLogin Below UI Test in Visual Studio Test Explorer

But is this duplication? Will a project benefit from having a test that checks a specification below the UI and another test that checks the same specification above the UI?  The table below contains examples of different quality related questions a project could ask themselves and the degree to which each type of test can help answer that question (the table is incomplete; many more examples could be added). I have colour coded the cells in the table to show my preferred type of test for a particular question (those coloured green being my preference). As you can see, tests that are good at answering one question are not so good, or completely incapable, of answering others. This is why I believe a joint effort between testers and developers to check each specification above and below the UI is worth considering.

Quality question

Would an ‘Above UI’ test answer this question?

Would a ‘Below UI’ test answer this question?

Does the AJAX alter the DOM in the correct way? Yes No
Are the UI elements mapped to the model correctly? Yes No
Does my website work on multiple browsers? Yes No
Is the business logic correct? Yes (but slow) Yes (fast)
Has my latest check-in broken the build? Yes (but slow) Yes (fast)
Does my error handling work as expected? Yes (but hard) Yes (easy)


There is, of course, nothing to say that every specification must be tested both above and below the UI. If a particular specification doesn’t lend itself to being tested either above or below the UI, the team can make the conscious choice to create a single test in this instance, possibly adding an attribute to the other test class (or specification class) to signal that a test has been consciously skipped rather than forgotten. On the topic of tracking and reporting, a team could also use some simple reflection to keep track of what specifications were being checked above the UI, below the UI or both. With something like this is place, any member of the team could add a specification and those responsible for creating tests would quickly realise there was a gap to fill. Even the results of exploratory testing or good old fashion bug hunts could be incorporated in this way.

There is also nothing to say that a UI-level test has to do everything above the UI. If the “Given” part of the test is particularly difficult to reproduce above the UI then that part of the test could be performed below the UI. For example, a test could directly manipulate the database to setup a particular system state, before performing an action and checking the expected result above the UI.


References

1. http://antonymarcano.com/blog/2011/05/updated-lessons-learned-in-close-quarters-battle/

The link above is to an article written by Antony Marcano in which he describes a multi-skilled team.

2 http://www.bcs.org/upload/pdf/tester-dec10.pdf

The link above is to an article written by Gojko Adzic in the December 2010 edition of The Tester in which he describes the on-going work to consolidate the practices and the language around BDD (or whatever it ends up being called!)

3 http://storyq.codeplex.com

More information about StoryQ

4 http://seleniumhq.org

More information about Selenium

Posted in Agile Testing, Behaviour Driven Development (BDD), Testing | Tagged: , , , , , , , , , , , , , , , , , , , , , | Leave a Comment »

How test automation with Selenium can fail

Posted by Matt Archer on November 29, 2010

Introduction

I like automated tests.  They’re typically quick to run and assuming they acquire the correct actual and expected result they rarely fail to produce an accurate comparison.  Don’t get me wrong, I’m no fanatic, but I have seen enough success to know that the right tool, in the right tester’s hand, can be a valuable addition to a project.

That said, I can see how test automation can fall out of favour within a project or organisation.  Tools have changed significantly over the years, however, for many projects their tool’s knack to do just about anything ironically remains its greatest strength and weakness.  Even if a project decides to use one of the latest tools for their particular technology, such as Selenium or Watir for GUI-level web testing, it is easy to erode the expected benefits if either tool is used inefficiently (something that is easier to do than you may think).

As I’m sure many of you already know, automated tests are small pieces of software that test (typically) larger pieces of software.  This makes them great for comparing one thing to another, assuming the comparison isn’t subjective.  Provide two numbers and an automated test will tell you whether they are equal.  Provide two pieces of text and an automated test will tell you whether they are the same.  Provide two pictures and an automated test will even tell you whether they contain the same pixels.  Bottom line – if an automated test gets the opportunity to compare two things we would otherwise compare by hand we can feel relatively confident that the final outcome (pass or fail) is the correct one.

So why can so many of us relate to the feeling I am about to describe?  You know, that feeling you sometimes get when you start to run your automation, and as the results are produced, not knowing whether it is the software you are testing that is failing or a problem with your automated tests.  For me, one of the goals of testing is to help a team feel confident that the software we are building is ready for a given event (such as a demo, a release or maybe just the next phase of the project).  On occasion, I find this desire for greater confidence to be in direct conflict with test automation.  This typically occurs if the automation is “flaky” and consequently I end up feeling less confident in my results compared to if I had performed the tests manually.  Have you ever tried making others feel confident, when you’re not feeling confident yourself?  It’s not easy.  In fact, easy or not, passing on false hope (or despair) is not the sort of habit you want to embrace.

At first glace, the root cause of this uncertainty can be difficult to track down, often leading to the conclusion that all automation is bad.  For me this is not true.  There are just a few approaches to automation that whilst in the right situation can prove useful, more often than not tend to cause the team an unnecessary headache.  One of these approaches is calculating expected results on the fly.  Another is including unnecessary navigation.

All example code that follows is a mix of pseudo code and Selenium C#.

Calculating expected results on the fly

Imagine for a moment that we are testing an online dispatch system for a logistics company.  Each morning the system receives a CSV file containing a list of items to dispatch that day.  There is a simple business rule that we want to test.  If an item weighs more than 50kg then mark the item as a two-man lift, otherwise mark the item as a one-man lift.  This sounds easy enough so we create an automated test to pass a file containing fictional items to the dispatch system and check each item has been labelled correctly on the website.

public void CheckWeightCategory_Version1()
{
    // For each item in the file, check it has been labelled correctly
    foreach (Item currentItem in testFile)
    {
        // Navigate to the item tracking page on the website
        selenium.Open("/ItemTrackingPage.html");

       // Get the weight category for the current item
        string acutalWeightCategory = selenium.GetText("weightCategory" + currentItem.ID);

        // Calculate the expected result
        string expectedWeightCategory;

        // If an item weighs more than 50kg then mark the item as a two-man lift,
        // otherwise mark the item as a one-man lift
        if (currentItem.weight > 50)
        {
            expectedWeightCategory = "two-man lift";
        }
        else
        {
            expectedWeightCategory = "one-man lift";
        }

        // Compare actual to expected result
        Assert.AreEqual(acutalWeightCategory, expectedWeightCategory);
    }
}

So that we can calculate the expected result of the fly, we have coded the if-then-else business rule in a similar way to the dispatch system itself.  On the up side this means that we can test as many input files as we like without having to worry about the expected result, however, we now have a mixture of code to prepare the expected result and code to perform the test, all intermingled together.  As the example stands at present, this doesn’t feel like a huge problem, but we are standing at the top of a very slippery slope.  Consider the following;

Q: What happens if the business rule is made more complex?

A: We can add some more code to represent it.

Q: What happens if a particular item is missing a weight?

A: We can add some more code to trap it.

Adding more code is fine in principal, but it can have an unpleasant side effect.  Below is an updated example based upon the two questions above.  Notice we now have eight lines of code related to calculating the expected result and only four lines of code that relate to performing the test itself.  In essence, we have created a test with three times as many lines of code than is absolutely necessary to perform the test.  By embedding the business rule, we have also made (or are at least are well on our way towards making) the code for our automated test as complicated as the system we are testing.  And this is one reason I can personally lose confidence in automation.  Crudely speaking, when the odds of finding a bug are equally divided between the system we are testing and our own test automation code we must think carefully about the return on investment we are likely to receive.

public void CheckWeightCategory_Version2()
{
    // For each item in the file, check it has been labelled correctly
    foreach (Item currentItem in testFile)
    {
        // Navigate to the item tracking page on the website
        selenium.Open("/ItemTrackingPage.html");

        // Get the weight category for the current item
        string acutalWeightCategory = selenium.GetText("weightCategory" + currentItem.ID);

       // Calculate the expected result
        string expectedWeightCategory;

        // If the customer wishes to collect the item from the warehouse,
        // the weight category should be marked as N/A
        if (currentItem.customerCollect == true)
        {
            expectedWeightCategory = "N/A";
        }
        else
        {
            // If the item does not have a weight, fail the test
            if (customer.weight != null)
            {
                // If an item weighs more than 50kg then mark the item as a two-man lift,
                // otherwise mark the item as a one-man lift
                if (currentItem.weight > 50)
                {
                    expectedWeightCategory = "two-man lift";
                }
                else
                {
                    expectedWeightCategory = "one-man lift";
                }
            }
            else
            {
                Assert.Fail("No weight available to calculate expected result");
            }
        }

       // Compare actual to expected result
        Assert.AreEqual(acutalWeightCategory, expectedWeightCategory);
    }
}

That said, any automated test that performs a comparison needs to know the expected results.  I can’t argue against this fact, but my recommendation would be to avoid calculating any expected results automatically, especially if that automatic calculation takes place as part of the test itself.  Like all aspects of testing there are countless ways of achieving a particular task and maintaining expected results is no exception.  If you believe that automatically calculating expected results is for you then I would at least consider separating the code that calculates the expected results from the code that performs the actual test.  And I don’t just mean splitting the code into two different methods that are executed one after the other by a single piece of code we call the test.  I’m talking about a much harder divide where one piece of code saves the expected results to a known location that can be read (maybe even edited) by a member of the team, before a second piece of code takes the persisted values and performs the comparison.  Not only does this keep a clean divide between the two pieces of code, it also allows for easier debugging based on human inspection (and where necessary manipulation) of the expected result before they are used as part of the test.

Another option is to work out any expected results “by hand” in the same way as if we were performing the test manually.  Once we have the expected results (assuming they are a sensible format) we can use them as the basis for both manual and automated tests.  I can tell what some of you are thinking, “my aim is to automate the majority of my tests and do very little testing manually”.  That may be a great aim for your project, but I guarantee that you will end up performing a great deal of manual testing, even if you do not call it by that name.  Whilst debugging automated tests (both as part of their creation and later as part of their maintenance) sometimes the best approach is to step through the lines of code, placing various break points and watching the value of variables change.  That said, on other occasions it’s far easier to perform the test manually to double check that the application is behaving as we expect, often proving both the quality of the website and the quality of the automation at the same time.  It can also be easier to explain a bug to somebody when you can demonstrate it manually rather than attempting to commentate on a screen that is racing past at one-hundred miles per hour.

Unnecessary Navigation

Let us now take a look at another potential destroyer of automated tests, unnecessary navigation.  Imagine for a moment that we are testing an online book store.  The customer is keen to ensure that every book is displayed with the correct title, description and price and has provided this data for a sample of 100 books.  To automatically check our sample books we could write something similar to the code below.  As part of its creation we would need to give it a meaningful name, such as CheckBookTitleDescriptionAndPrice.

public void CheckBookTitleDescriptionAndPrice_Version1()
{
    foreach (Book currentBook in testFile)
    {
        // Open the homepage
        selenium.Open("/HomePage.html");
        selenium.WaitForPageToLoad("30000");

        // Login
        selenium.Click("link=Login");
        selenium.WaitForPageToLoad("30000");
        selenium.Type("TxtUserName", "TestAccount1");
        selenium.Type("TxtPassword", "TestPassword1");
        selenium.Click("Submit");
        selenium.WaitForPageToLoad("30000");

        // Search for the book we want to check
        selenium.Click("link=Search");
        selenium.WaitForPageToLoad("30000");
        selenium.Type("TxtSearchTerm", currentBook.Title);
        selenium.Click("Submit");
        selenium.WaitForPageToLoad("30000");

       // Open the Detailed Information page for the book we want to check<br />
        selenium.Click(currentBook.ID);
        selenium.WaitForPageToLoad("30000");

        // Check that the Detailed Information page has loaded
        Assert.AreEqual("Detailed Information page", selenium.GetTitle());
        
        // Compare the information on the Detailed Information page to our expected results
        string actualBookTitle = selenium.GetText("BookTitle" + currentItem.ID);
        Assert.AreEqual(actualBookTitle, currentBook.Title);
        
        string actualBookDescription = selenium.GetText("BookDescription" + currentItem.ID);
        Assert.AreEqual(actualBookDescription, currentBook.Description);
        
        string actualBookPrice = selenium.GetText("BookPrice" + currentItem.ID);
        Assert.AreEqual(actualBookPrice, currentBook.Price);
    }
}

This code is fine in principle, but just how much of it is actually related to the things we want to check?  Do we really need to login to the system, start this test from the homepage and use the search functionality to find the relevant book?  Probably not is the answer.  But what is the problem with having these actions in the test, they’re surely not causing any harm and you never know we may stumble across a bug that we weren’t expecting to find by mistake?

Whilst this sounds nice in principle, for me, there are two problems with the philosophy of if I’m lucky I might find some extra bugs by chance, for free! Even though this sounds great of the surface, automated tests that stumble across a bug (other than the one(s) they were deliberately trying to detect) can take a considerable time to diagnose as we ponder over whether it is the website that is broken, or dare I say it, the test itself.  The frustration, however, does not stop there.  If the homepage, search or login happened to be broken then there is a strong possibility that any test that uses those features as part of their navigation will fail to reach the part of the system we are trying to test.  Not ideal if we need a quick assessment of the website’s quality as we prepare for a release later that day.  At this point in time, our automated tests are next to useless, as all they tell us (and this may not even be directly) is that the homepage is broken.  It is also misleading for a test entitled CheckBookTitleDescriptionAndPrice to fail even though there is nothing potentially wrong with anything the title suggests.

Fortunately the solution is easy.  We put this (in my opinion, unnecessary) navigation in by choice, but if it’s surplus to requirements why not leave it out or replace it with something more succinct?  We could rewrite our test to look something similar to the code below.  Notice how we have reduced the amount of unnecessary navigation by replacing much of our previous example with a single, parameterised deep link.

public void CheckBookTitleDescriptionAndPrice_Version2()
{
    foreach (Book currentBook in testFile)
    {
        // Navigate directly to the Detailed Information Page for the book we want to check
        selenium.Open("/DetailedInformationPage?bookId" + currentBook.ID);
        selenium.WaitForPageToLoad("30000");

        // Check that the Detailed Information page has loaded
        Assert.AreEqual("Detailed Information page", selenium.GetTitle());

        // Compare the information on the Detailed Information page to our expected results
        string actualBookTitle = selenium.GetText("BookTitle" + currentItem.ID);
        Assert.AreEqual(actualBookTitle, currentBook.Title);

        string actualBookDescription = selenium.GetText("BookDescription" + currentItem.ID);
        Assert.AreEqual(actualBookDescription, currentBook.Description);

        string actualBookPrice = selenium.GetText("BookPrice" + currentItem.ID);
        Assert.AreEqual(actualBookPrice, currentBook.Price);
    }
}

Summary

I am not suggesting that calculating expected results on the fly or tests with large amounts of navigation should never be used, but I do believe they should be treated with caution.   Both approaches leave tests less focused, harder to maintain and open to a variety of false failures.  As I mentioned at the beginning, I like automated tests.  They’re typically quick to run and assuming they acquire the correct actual and expected result they rarely failed to produce an accurate comparison.  And here lies the problem.  Over time, calculating expected results of the fly can reduce the probability of a test acquiring the correct expected results and unnecessary navigation can make it much harder for a test to capture the actual result.  If we keep both of these things to a minimum, we provide each test with a much greater chance of getting to the part is does best – the comparison.

Posted in Test Automation, Testing | Tagged: , , , , , , , , , , , , , , , , , , , , , | 1 Comment »

Book Review: Software Test Engineering with IBM Rational Functional Tester

Posted by Matt Archer on January 27, 2010

Like many others testers, I regularly incorporate IBM Rational Functional Tester (once known as XDE Tester) into my test automation repertoire.  For those of you that aren’t familiar with the tool, Rational Functional Tester (often abbreviated to RFT) is a GUI-level test automation tool that can be used to automate the functional testing of both Windows and Web based applications.  If you’re interested, more information can be found on the official IBM Rational website here.

To accompany the tool, IBM Press have recently published a book entitled “Software Test Engineering with IBM Rational Functional Tester”.  The authors have left no stone unturned in their feature by feature discussion of the tool’s abilities, which undoubtedly makes it worthy of its tagline – “The Definitive Resource”.

As an experienced user I found myself skipping pages in the early chapters, but it’s not long before the book arrives at the juicer topics, including handling unsupported objects, testing specialised applications (SAP, Siebel, Flex, etc) and using RFT within a Linux environment.

For those new to RFT I would follow the authors’ advice and not attempt a cover to cover read.  The first few chapters will provide a new user with everything they need to know to get started and be productive.  The remainder of the 600+ pages can then be dipped into as necessary.

My favourite part of the book is the script samples that are scattered throughout every chapter.  Like any automated testing tool, sometimes the best solution is to hand-craft all or part of your script.  It is at this point that the average tester (myself included) typically turns to Google with the hope of finding a similar example.  I can remember spending hours looking for information on how best to query a database, connect to excel and extract data from a PDF.  All of these topics are covered in the book with examples, along with many others.

Your local bookshop / website should have no problem getting you a copy if you’re interested.  For those members of the BCS Special Interest Group in Software Testing (SiGIST), you can also borrow a copy for free from the SiGIST Library.

Posted in Test Automation, Testing | Tagged: , , , , , , , , , , , , , , , , , , , , | 10 Comments »

Software Quality Conference – Dublin, 4 Mar 2009

Posted by Matt Archer on January 29, 2009

In a little over a month I will be visiting Ireland to speak at the Irish Software & Systems Quality conference, in Dublin. It will be the first time I have visited Ireland, so hopefully I’ll be able to do a bit of sightseeing whilst I’m there.

My talk is about how much documentation we need as testers. You can find the abstract here.

If you’re interested in coming along you can register here.

As a speaker I can get a limited number of delegates a 20% discount. Contact me if you’re interested.

Posted in Conferences and Events, Test Documentation, Testing | 2 Comments »

The Testing V-Model Catch-22

Posted by Matt Archer on December 8, 2008

I rarely meet a tester that has never heard of the V-Model. It’s one of the parts of the software testing body of knowledge that every tester seems to know about, even if it is just by name. I’ve added a picture that summaries the model below (Source: Wikipedia).

I’ve seen the V-Model used in two different ways. One approach is to use the V-Model as an extension to a waterfall software development lifecycle, where the “V” is perform just once. The other approach is to use the V-Model as an extension to an iterative software development lifecycle where lots of mini-“V”s are performed, one per iteration.

Regardless of how you apply the V-Model (just once or iteratively) the prescribed sequence of testing levels on the right-and-side of the “V” (Unit Testing -> Integration Testing -> System Testing -> Acceptance Testing) can encourage a project to work in a way that may not be in their best interest. This is easiest to explain if we just look at two of the testing levels, System and Acceptance. I’ve added definitions (taken from the ISTQB Glossary) for each term below.

System Testing: The process of testing an integrated system to verify that it meets specified requirements.

Acceptance Testing: Formal testing with respect to user needs, requirements, and business processes conducted to determine whether or not a system satisfies the acceptance criteria and to enable the user, customers or other authorized entity to determine whether or not to accept the system.

My own interpretation of these terms and how they relate to the V-Model is that a group of testers perform system testing to checks that the application doesn’t contain any bugs, before one or more users perform acceptance testing to check they like the application and it’s going to truly help them accomplish one or more tasks quicker, more accurately, with more confidence, etc.

This always sounds sensible to me until I remember how much time most people spend system testing, how much users love to change their mind and how changing anything tends to introduce more bugs and the need for more testing. In a fairly extreme example, but a team could write some software, system test it to make sure it’s free of bugs, get a group of users to acceptance test it, who ask for 95% of the system to be changed… And then we’re back to square one!

This would, of course, be much more of a tear-jerking moment if you had chosen only to follow the “V” once in a waterfall style, compared to if you were performing many mini-“V” in an iterative pattern. However, even with many mini-“V” the team could still have wasted precious time and money system testing something that will never see the light of day.

So here’s the Catch-22 with the V-Model… Nobody wants to put a buggy piece of software in front of their users, but who wants to spend precious time and money system testings a feature that may be changed or removed?

If you interpret the V-Model as all system testing must be completed before acceptance testing can be started then the project is likely to run into problems. Either the application will be changed and the tester may feel like their original work was for nothing, or the application will remain unchanged and the users may feel like they didn’t get the solution they wanted. Neither of which are good.

Like with many Catch-22 situations, a compromise can be found if the rules of the game are loosened. The problem stems for trying to complete system testing and gold-plating the application before allowing users to perform acceptance testing. This is never going to work as the team will always end up changing something (even if it’s just something small) which need to be system tested again.

For me, the solution is not to try to finish system testing before acceptance testing begins, but instead perform as much system testing as necessary (no more, no less) to be confident that the application is of sufficient quality to be acceptance tested by the user(s). Once the application is then stable in terms of its features and how those features are realised the team can then focus on completing any outstanding system testing necessary to be confident that the application is of sufficient quality to release.

This means that a team should get into the habit of thinking about two different thresholds when it comes to an application being fit-for-purpose. (1) Is it fit-for-acceptance testing, and then (2) Is it fit-for-release.


Posted in Testing | Tagged: , , , , , , , , , , , , | 5 Comments »

Rational Functional Tester: Test Automation Architecture

Posted by Matt Archer on October 28, 2008

This post is part 2 of a series of 5 posts about test automation with Rational Functional Tester.  I originally created the material as a white paper in 2004 when I was coaching a project that was new to GUI-level automation and also to RFT.  I recently discovered it during a clean up and whilst some on my ideas have changed over the past 4 years, I’m happy that most of it still holds up as good advice.  Maybe one day I’ll update it.

The other posts in this series are (Part 1) Planning Test Automation, (Part 3) Creating Automated Tests, (Part 4) Reviewing Automated Tests and (Part 5) Using and Maintaining Automated Tests.


Identify Custom Recognition Mechanisms
IBM Rational Functional Tester provides a Test Object Map that contains a list of every Test Object that is interacted with during the recording process.  Each object is assigned a unique name so that it can be referenced from within the automated test script.  For the majority of tests, the Test Object Map provides a sufficient mechanism for recognising and interacting with the Test Objects within the application.  However, there are some occasions when it is not desirable to use the Test Object Map and a custom recognition method is written to find and retrieve the necessary Test Object.  Review the parts of the application you intend to automate and identify where a custom recognition method may be necessary.  Often this activity will need to be accompanied by an investigation of how IBM Rational Functional Tester interacts with the project’s application and how Test Objects are stored within the Test Object Map.

For each custom recognition method that is identified, add its description to the project’s test automation architecture document.  As a minimum, express the custom recognition method in terms of its signature and an example of when the method can be utilised to benefit the tester.  It is likely that this section will evolve over the life of the project as new custom recognition needs are identified.  As this occurs, ensure that you keep the test automation architecture document up-to-date.

Identify Custom Verification Mechanisms
IBM Rational Functional Tester provides three distinct methods for verifying the state of the application under test.  They are Object Data, Object Property and Object Existence.  For the majority of tests, the relevant verification points can be implemented using one of the standard verification methods.   However, there are some occasions when the test cannot be reliably interpreted as a pass or fail and consequently a custom verification mechanism must be produced to obtain an accurate result.  Review the parts of the application you intend to automate and identify where a custom verification method may be required.  Often this activity will need to be accompanied by an investigation of how IBM Rational Functional Tester interacts with the project’s application and how Test Objects can be interrogated (using the three standard verification methods) to extract the application’s state.

For each custom verification point that is identified, add its description to the project’s test automation architecture document.  As a minimum, express the custom verification method in terms of its signature and an example of when the method can be utilised to benefit the tester.  It is likely that this section will evolve over the life of the project as new custom verification needs are identified.  As this occurs, ensure that you keep the test automation architecture document up-to-date.

Identify Test Bed Components
The key to successful automated testing is a well-defined and maintained test environment.  Combined with the state of the application (typically defined by the information that it contains within the application database) this is known as the test bed.  Before each automated test cycle begins, it is important for the test team to reset the test bed to a known state to avoid misleading results and false failures.

Investigate the application under test and identify the different components that together form the test bed.  Some of the test bed components will remain static during testing (typically, the operating system), whilst other test bed components will change as a result of the automated testing.  Document each test bed component and note which components are dynamic and which are static.  For each dynamic test bed component detail how it will be manually reset to a known state before automated test execution can begin.  This information is typically stored in the project’s test automation architecture document.

Capture Test Bed Automation Needs
Resetting a test bed before test automation begins can be a time consuming activity.  As your familiarity with IBM Rational Functional Tester increases you should consider how you can automate resetting the test bed (potentially to a variety of different configurations).  The complexity of automating such a task will vary greatly depending on the application under test and the test team’s ability to acquire a self-contained test bed.  Ensure that the benefits received by automating the resetting of the test bed outweigh the cost of developing the necessary code within IBM Rational Functional Tester.  For each dynamic test bed component that you decide to automate the resetting of, detail how it will be achieved using IBM Rational Functional Tester.  This information is typically stored in the project’s test automation architecture document.

Define Failure Recovery Routines
One of the distinct benefits of automated testing is the ability to verify the quality of an application without any human interaction.  On occasions (due to test script faults, defects within the application, and incorrect test bed configurations, to mention a few) the automated tests will become unsynchronised with the application under test.  That is to say, the automated test is expecting to interact with a specific test object, but that test object cannot be found as the application is displaying another window or has closed / frozen due to a serious application crash.  In summary the application under test is not in the same state that the automated test is expecting.  If a synchronisation error occurs it will typically leave any unexecuted automated tests incapable of running.  To minimise the number of affected tests, the test team should consider incorporating some form of failure recovery into their automation testing solution.  The sophistication of a failure recovery routine will depend on the ability to control the test bed using IBM Rational Functional Tester.  It is recommended that a test team start with simple failure recovery routines, such as those used to handle unexpected active windows.  As the test team’s experience of IBM Rational Functional Tester increases, they should consider additional failure recovery routines, such as those that are capable of completely resetting the test bed to a known baseline.  As the test team identifies failure recovery routines they should be documented within the project’s test automation architecture document.  As a minimum, each failure recovery routine should be described in terms of the criteria (or signal) that will trigger the routine, the test bed components affected and the state to which the test bed components will be returned.

Define Test Data Structure and Storage Needs
One of the powers of automated testing is the ability to perform the same scenario multiple times, with different variants of test data.  To take advantage of this power, the test data must be stored in a maintainable format, which can be easily accessed by both the test team and the automated test script.  As a rule of thumb, large volumes of hard-coded values should be avoided and the test data should be stored independently of the automated test script.  The possibilities for independent data storage are endless, but a common set of options exist, including IBM Rational Datapools, Excel spreadsheets and external databases.  Investigate which test data structure and type of storage best fits the test team’s needs.  Document the location of the test data, its structure and any special routines required to access the test data in the project’s test automation architecture document.

Define Package Structure
As you automated testing solution grows it will quickly expand to a large number of elements, including various test scripts, datapools and verification points.  To avoid your automated testing solution becoming unmanageable and difficult to maintain, it is a good idea to agree a package structure before your begin the majority of your automating testing development.  The structure of a project’s packages will be determined by their specific needs.  However, it is typical to subdivide test scripts into separate packages that represent functional areas, application feature or use-case.  A separate temporary ‘scratch’ package to keep ideas for new techniques and approaches can also be useful.  A project’s package structure should be recorded within the test automation architecture document.

Agree Naming Conventions
Maintaining an automated testing solution can be significantly aided by using a common set of naming conventions throughout the entire test team.  Naming conventions will also increase readability and help other testers read your automated test scripts as if they were their own.  Many organisation own naming conventions that apply to other area of the software development lifecycle.  Where appropriate, the test team may also use these conventions.  For elements that are specific to the test discipline, such as verification points, various test scripts, and datapools, the test team should define their own naming conventions and record them in the project’s test automation architecture document.

Identify Common-Code Owner and Policy
Reusing common-code within an automated testing solution can dramatically reduce development time and increase maintainability by providing a single point fix.  IBM Rational Functional Tester supports the use of common-code through a Helper Super Class that is inherited by each test scripts.  As each test script within a Functional Tester Project inherits from the Super Helper Class any changes made to the Super Helper Class may affect the way in which each test script performs its tests.  Therefore any changes made to the Super Helper Class (that is to say, the common-code) should be controlled.  The formality of this management will vary depending on the size and complexity of the project and the associated automated testing solution.  Look within your project team and identify a person or group of people that will act as the common-code owner.  It will be the common-code owner’s responsibility to review and agree any changes and additional to the Super Helper Class.  Within the project’s test automation architecture document identify the project’s common-code owner and how they will handle requests to alter the Super Helper Class.  Also describe how requests to the common-code are to be submitted and managed.

Techniques for Agile Manual Testers Banner

Posted in Test Automation, Testing | Tagged: , , , , , , , , , , , , , , , , , , | 4 Comments »